Change Email Id On Facebook New Updated 2019

Anyhow, changing an e-mail on Facebook isn't a complex procedure at all. You'll just require to produce an additional email account if you don't have one currently, then follow the actions below to get the job done. To create an email account you can use any type of totally free e-mail service provider like Gmail, Overview, Yahoo or whatever e-mail carrier you prefer.
So, how do I transform my email address on Facebook?
In this post, I'll reveal you in comprehensive steps how you can add an e-mail address to your Facebook account, make it as a key and also remove the old one. If you're ready to recognize how, after that allow's adhere to the steps below!
Change Email Id On Facebook
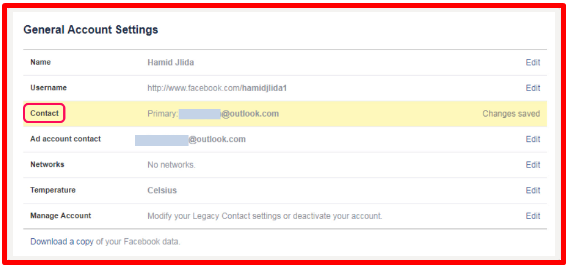
Step 1: Click the down arrow on top right of any Facebook web page and select Settings to open your Facebook general Settings.

Step 2: Click Edit to the right of Call.

Step 3: Click the link that states Include one more email or mobile number.

Step 4: Kind the brand-new e-mail that you wish to include in your Facebook account then press the Include switch.

Step 5: Facebook will send you an Email with the confirmation link to the address e-mail that you have simply added.

Step 6: Currently, you ought to verify it. To do so, you should log into your e-mail account and click the Confirm web link.

Step 7: Once you click the Confirm link, you will be taken back to your Facebook general account settings. As well as what you need to do afterwards, is click on Contact to open your e-mail setups once more.
Step 8: When there, tick package beside the new email that you would like to set it up as a key, after that push the Save Modifications switch. (you may be motivated to enter your password. Simply do it as well as conserve the modifications).

Up until this minute everything is fine. You have actually set a brand-new key e-mail address and also you still have an additional email detailed under your Facebook account. Currently, you can keep them both and this is the recommended pointer from Facebook, in case if you lose accessibility to among them.
Step 9: If you decided to remove the old email address (the second email), simply click Edit to the right of Get in touch with.

Step 10: After that, click the Eliminate link alongside the second email that you desire get rid of from your Facebook account. (you might be triggered to enter your password. simply do it as well as save the changes).

That's it! How did you discover this post? Was it helpful for you?
If so, please, don't neglect to share it on social media websites.